Multilingua
XLoader/FormBook: Encryption Analysis and Malware Decryption
Tempo di lettura: 6 minuti. Xloader is a stealer, the successor of FormBook

Today ANY.RUN’s malware analysts are happy to discuss the encryption algorithms of XLoader, also known as FormBook. And together we’ll decrypt the stealer’s strings and C2 servers.

Xloader is a stealer, the successor of FormBook. However, apart from the basic functionality, the unusual approaches to encryption and obfuscation of internal structures, code, and strings used in XLoader are also of interest. Let’s take a detailed look at the encryption of strings, functions, and C2 decoys.
IceXLoader ha infettato migliaia di vittime in tutto il mondo
Ecco il malware che eluce i blocchi impostati da Microsoft sulle VBA
DotRunpeX diffonde diverse famiglie di malware tramite annunci pubblicitari
Gookit all’attacco di organizzazioni sanitarie e finanziarie
Encryption in XLoader
First, we should research 3 main cryptographic algorithms used in XLoader. These are the modified algorithms: RC4, SHA1, and Xloader’s own algorithm based on a virtual machine.
The modified RC4 algorithm
The modified RC4 algorithm is a usual RC4 with additional layers of sequential subtraction before and after the RC4 call. In the code one layer of subtractions looks like this:
| # transform 1 for i in range(len(encbuf) – 1, 0, -1): encbuf[i-1] -= encbuf[i] # transform 2 for i in range(0, len(encbuf) -1): encbuf[i] -= encbuf[i+1] |
The ciphertext bytes are subtracted from each other in sequence from right to left. And then they go from left to right. In the XLoader code it looks like this:

Function performing RC4 encryption
The modified SHA1 algorithm
The SHA1 modification is a regular SHA1, but every 4 bytes are inverted:
| def reversed_dword_sha1(self, dat2hash): sha1Inst = SHA1.new() sha1Inst.update(dat2hash) hashed_data = sha1Inst.digest() result = b”” for i in range(5): result += hashed_data[4*i:4*i+4][::-1] return result |
Xloader’s own virtual machine algorithm
The last algorithm is a virtual machine that generates one to four bytes of plaintext, depending on the current byte of the ciphertext. Usually, this algorithm is used as an additional encryption layer, which will be discussed later. The entry of the VM decryption routine looks like this:

An example of transformations in a virtual machine’s decryption routine
Decrypting XLoader Strings
Next, let’s investigate how the string encryption works in XLoader. All byte arrays containing encrypted strings or key information are located in special kinds of blobs.

An example of a blob with encrypted data
As you can see in the screenshot above, this blob is a function that returns a pointer to itself, below this function are the bytes you are looking for.
In order to decrypt strings, first a key is generated. The key is generated from 3 parts, to which the above-described functions are applied.

Key generation function to decrypt strings
Here K1_blob, K2_blob, and K3_blob are functions that return data from the blocks described above, and the string length is an argument for them.
The functions VM_Decrypt, RC4_with_sub_Layer and sha1_* are modified algorithms that we discussed earlier.
Schematically, the key generation algorithm can be represented by the following diagram.
Here E and K are the data and the key that is fed to the input of the RC4 function, respectively, and K1, K2, and K3 are the data obtained from the K1_blob, K2_blob, and K3_blob functions.

Scheme of key generation to decrypt strings
The strings themselves are also stored as a blob and are covered by two layers of encryption:
- VM_decrypt
- RC4 that uses the key obtained above.
At the same time, RC4 is not used for the whole blob at once.
After removing the first layer, the encrypted strings themselves are stored in the format:
encrypted string length – encrypted string
Consequently, to decrypt the strings, we need to loop through this structure and consistently decrypt all the strings.

Function for decrypting strings
Below is an example of the encrypted data after stripping the first layer. Length/string pairs for the first 3 encrypted strings are highlighted in red.

The first 3 encrypted strings
The same strings after decryption:

The first 3 lines after decoding
Along with the encrypted strings, C2 decoys are also stored there. They are always located at the end of all decrypted strings, beginning and ending with the f-start and f-end strings.
Decrypting XLoader’s C2 Servers
Next, let’s see how the main C2 encryption works. The main C2 is located elsewhere in the code, so you can get it separately from the C2 decoys.

Code snippet demonstrating C2 decryption.
To decrypt it, as well as to decrypt the strings, 3 keys are used. The C2 decryption scheme is shown below:
- EC2 is the encrypted C2
- DC2 is the decrypted C2
The algorithm itself is a 3 times sequential application of the RC4 algorithm with 3 different keys.

C2 decoys’ decryption scheme
Also, in newer versions of XLoader C2 decoys, which usually lie along with all the other strings, turn out to be covered by an additional layer of encryption, and, at first glance, it is completely unclear where exactly the decryption of these strings occurs.
Since XLoader has several entry points, each responsible for different non-intersecting functionality, with many functions turning out to be encrypted.
The C2 decoys are decrypted inside the XLoader injected into Explorer.exe. And in this case, it is passed to netsh.exe, which also contains XLoader via APC injection.

The C2 life cycle in different XLoader modules
In order to understand how a C2 decoy is encrypted, first of all, you need to understand how the functions are encrypted.
It’s actually quite simple. RC4 is used as the encryption algorithm. This time, the key is hardcoded and written right in the code and then xored with the 4-byte gamma.
After that, you should find pointers to the start and end of the function. This is how you do it: a unique 4-byte value is placed at the beginning and end of each encrypted function. The XLoader looks for these values and gets the desired pointers.

Code snippet demonstrating the decryption of the function
Then the function is decrypted, control is given to it, and it similarly searches for and decrypts the next function. This happens until the function with the main functionality is decrypted and executed. So, functions should be decrypted recursively.
The key to decrypting C2 decoys consists of 2 parts and is collected separately at two different exit points. One exit point gets the 20-byte protected key, and the second gets the 4-byte gamma to decrypt the key.
Example of extracted XLoader malware configuration
Applying the above algorithms we can extract the configuration from Xloader, including C2, C2 decoys, and strings. For your convenience, we have integrated automatic extraction of the Xloader configuration into ANY.RUN interactive sandbox — just run the sample and get all the IOCs in seconds.


Extracted malware configuration in ANY.RUN
Examples of successfully executed samples:
Sum it up
In this article we discussed the encryption in xLoader stealer. It is based on both add-ons to existing algorithms and self-written algorithms.
The main tricky part of the decryption process is the key generation and the fact that the XLoader functionality is split into modules that can be run in different processes. Because of this, in order to extract strings, we have to decrypt the executable code, among other things.
Fortunately, ANY.RUN is already set up to detect this malware automatically, making the relevant configuration details just a click away.
Appendix
Analyzed files
Sample with new C2 decoys encryption
| Title | Description |
| Name | MT10320221808-004. pdf.exe |
| MD5 | b7127b3281dbd5f1ae76ea500db1ce6a |
| SHA1 | 6e7b8bdc554fe91eac7eef5b299158e6b2287c40 |
| SHA256 | 726fd095c55cdab5860f8252050ebd2f3c3d8eace480f8422e52b3d4773b0d1c |
Sample without C2 decoys encryption
| Title | Description |
| Name | Transfer slip.exe |
| MD5 | 1b5393505847dcd181ebbc23def363ca |
| SHA1 | 830edb007222442aa5c0883b5a2368f8da32acd1 |
| SHA256 | 27b2b539c061e496c1baa6ff071e6ce1042ae4d77d398fd954ae1a62f9ad3885 |
Multilingua
DarkGate e l’iniezione di Template Remoti: nuove tattiche di attacco
Tempo di lettura: 2 minuti. Nuove tattiche di DarkGate: iniezione di template remoti per aggirare le difese e infettare con malware tramite documenti Excel.

Recentemente, Cisco Talos ha rilevato un aumento significativo di campagne email malevole contenenti allegati sospetti di Microsoft Excel che, una volta aperti, infettano il sistema della vittima con il malware DarkGate. Queste campagne, attive dalla seconda settimana di marzo, utilizzano tecniche, tattiche e procedure (TTP) mai osservate prima negli attacchi DarkGate.
Tecnica dell’Iniezione di Template Remoti

Le recenti campagne di DarkGate sfruttano una tecnica chiamata “Remote Template Injection” per bypassare i controlli di sicurezza delle email e ingannare l’utente a scaricare ed eseguire codice malevolo quando viene aperto il documento Excel. Questa tecnica consente di importare template da fonti esterne per espandere le funzionalità di un documento, eludendo i protocolli di sicurezza che potrebbero non essere stringenti per i template rispetto ai file eseguibili.
Dettagli Tecnici dell’Attacco

Le email malevole individuate da Cisco Talos contenevano allegati di Excel con nomi distintivi, principalmente riguardanti questioni finanziarie o ufficiali, per convincere il destinatario ad aprire il documento. L’infezione inizia quando il documento Excel viene aperto, scaricando ed eseguendo un file VBS da un server controllato dall’attaccante. Il file VBS contiene un comando che esegue uno script PowerShell dal server di comando e controllo (C2) di DarkGate.
Cambiamenti nei Payload e nei Linguaggi di Scripting
Dal 12 marzo 2024, le campagne di DarkGate hanno iniziato a utilizzare script AutoHotKey invece di AutoIT. AutoHotKey offre funzionalità avanzate di manipolazione del testo, supporto per hotkey e una vasta libreria di script user-contributed. Gli script AutoHotKey scaricano e decodificano dati binari direttamente in memoria, eseguendo il payload di DarkGate senza mai salvarlo su disco.
Meccanismi di Persistenza
I componenti utilizzati durante l’ultima fase dell’infezione vengono memorizzati nella directory C:\\ProgramData\\cccddcb\\. La persistenza attraverso i riavvii viene stabilita creando un file di collegamento nella directory di avvio del sistema infetto. Cisco Talos ha sviluppato meccanismi di rilevamento e blocco per queste campagne su prodotti Cisco Secure.
Multilingua
LightSpy: la nuova minaccia per macOS
Tempo di lettura: 3 minuti. Il malware LightSpy che prende di mira i dispositivi macOS, i metodi di infezione e le funzionalità dei plugin per l’esfiltrazione di dati.

Recentemente, è stata scoperta una variante del malware LightSpy che prende di mira i dispositivi macOS. Questo malware, originariamente noto per attaccare dispositivi iOS e Android, ha ora dimostrato di poter compromettere anche i sistemi macOS. Le indagini condotte da ThreatFabric e Huntress hanno rivelato dettagli tecnici significativi sulle capacità di questo malware e sui metodi utilizzati per infettare i dispositivi.
Contesto e Scoperta
Il framework di spyware LightSpy è noto per la sua versatilità e capacità di compromettere vari sistemi operativi. Originariamente, il malware ha preso di mira dispositivi iOS e Android, ma ora ha esteso il suo raggio d’azione a macOS. La variante per macOS è stata identificata tramite campioni caricati su VirusTotal e analizzati da Huntress e ThreatFabric.
Metodi di Infezione

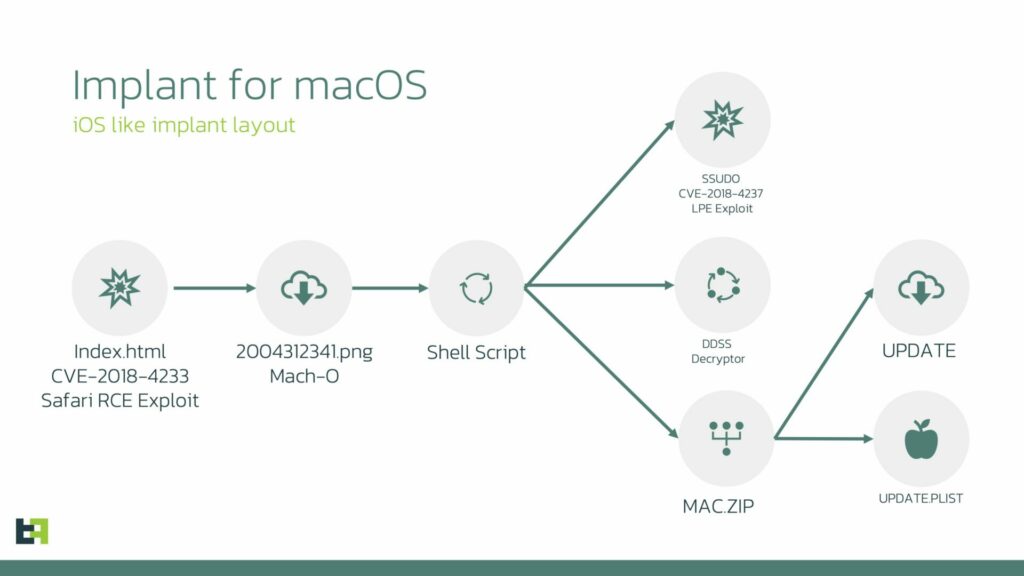
Il gruppo di attori malevoli dietro LightSpy utilizza exploit pubblicamente disponibili per distribuire gli impianti su macOS. Due exploit noti, CVE-2018-4233 e CVE-2018-4404, sono stati utilizzati per colpire versioni di macOS 10.13.3 e iOS precedenti alla 11.4.

Il malware inizia con l’esecuzione arbitraria di codice tramite una vulnerabilità di WebKit all’interno di Safari, seguita da un’escalation di privilegi specifica del sistema operativo.
Analisi Tecnica
Fase Iniziale
Il punto di partenza dell’attacco è un exploit di WebKit che consente l’esecuzione di codice arbitrario non privilegiato. Una volta attivato, l’exploit distribuisce un payload denominato “20004312341.png”, che è in realtà un file eseguibile MachO x86_64 contenente una funzione di iniezione.
Downloader Intermedio
Il file “20004312341.png” decifra un blocco di 0x400 byte incorporato nel file eseguibile e lancia il risultato utilizzando launchd. Questo script scarica tre ulteriori file utilizzando l’utilità curl, inclusi “ssudo” (un exploit di escalation dei privilegi), “ddss” (un file di cifratura/decifratura) e un archivio ZIP contenente “update” e “update.plist”.
Loader e Persistenza
Il file “update” è progettato per configurare e avviare il Core di LightSpy, fornendo le informazioni necessarie per la comunicazione con il server di comando e controllo (C2). Una volta eseguito, “update” assicura la persistenza nel sistema utilizzando launchctl, avviandosi ad ogni riavvio del sistema.
Funzionalità del Core e Plugin

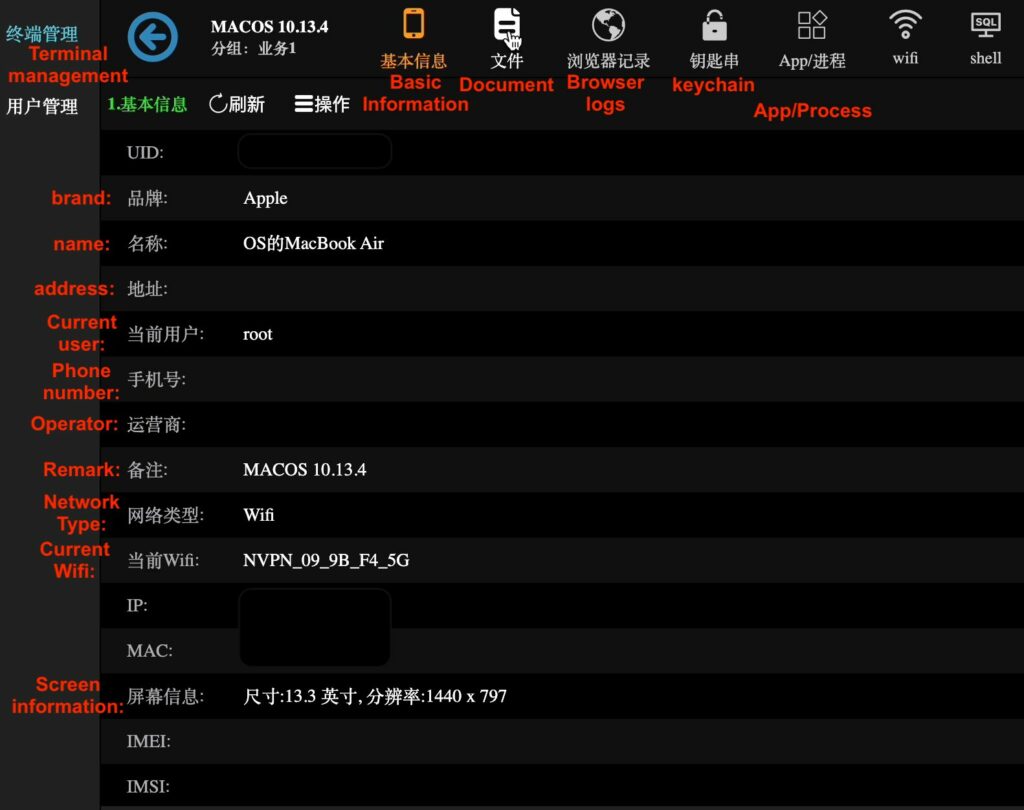
Il Core di LightSpy è responsabile della raccolta delle informazioni sul dispositivo e della gestione dei comandi dal server C2. Utilizza un database SQLite per memorizzare dati di configurazione, comandi e piani di controllo. Durante l’indagine, è stata scoperta una versione del Core denominata “C40F0D27”, che funge da orchestratore del framework di sorveglianza.
Plugin Specifici
LightSpy per macOS supporta 10 plugin principali per l’esfiltrazione di informazioni private:
- SoundRecord: Registra l’audio dal microfono del dispositivo.
- Browser: Esfiltra la cronologia dei browser Safari e Chrome.
- CameraModule: Scatta foto utilizzando la fotocamera del dispositivo.
- FileManage: Esfiltra e manipola file e directory, compresi dati da messaggistica come WeChat, Telegram e QQ.
- Keychain: Esfiltra password, certificati e chiavi dalla Keychain di Apple.
- LanDevices: Scansiona la rete locale per trovare dispositivi connessi.
- Softlist: Esfiltra l’elenco delle applicazioni installate e dei processi in esecuzione.
- ScreenRecorder: Registra video dello schermo del dispositivo.
- ShellCommand: Fornisce una shell remota per l’operatore.
- WiFi: Esfiltra dati sulle reti Wi-Fi vicine e la cronologia delle connessioni Wi-Fi.
Implicazioni e Conclusioni
La scoperta della variante macOS di LightSpy dimostra che il malware è in continua evoluzione e in grado di prendere di mira una gamma più ampia di dispositivi. Gli utenti di macOS devono essere consapevoli delle potenziali minacce e adottare misure per proteggere i loro sistemi, inclusi aggiornamenti regolari e l’uso di strumenti di sicurezza avanzati. La collaborazione tra ricercatori di sicurezza e aziende come Huntress e ThreatFabric è cruciale per identificare e mitigare queste minacce.
Multilingua
Commando Cat: Cryptojacking innovativo che sfrutta i Server API Remoti di Docker
Tempo di lettura: 2 minuti. Commando Cat, un attacco di cryptojacking che sfrutta i server API remoti di Docker esposti, mette in luce la necessità di pratiche di sicurezza robuste per i contenitori.

Un nuovo attacco di cryptojacking, denominato Commando Cat, sta prendendo di mira i server API remoti di Docker esposti per distribuire miner di criptovalute. Gli attaccanti utilizzano immagini Docker del progetto open-source Commando per eseguire questa campagna.
Dettagli dell’Attacco Commando Cat
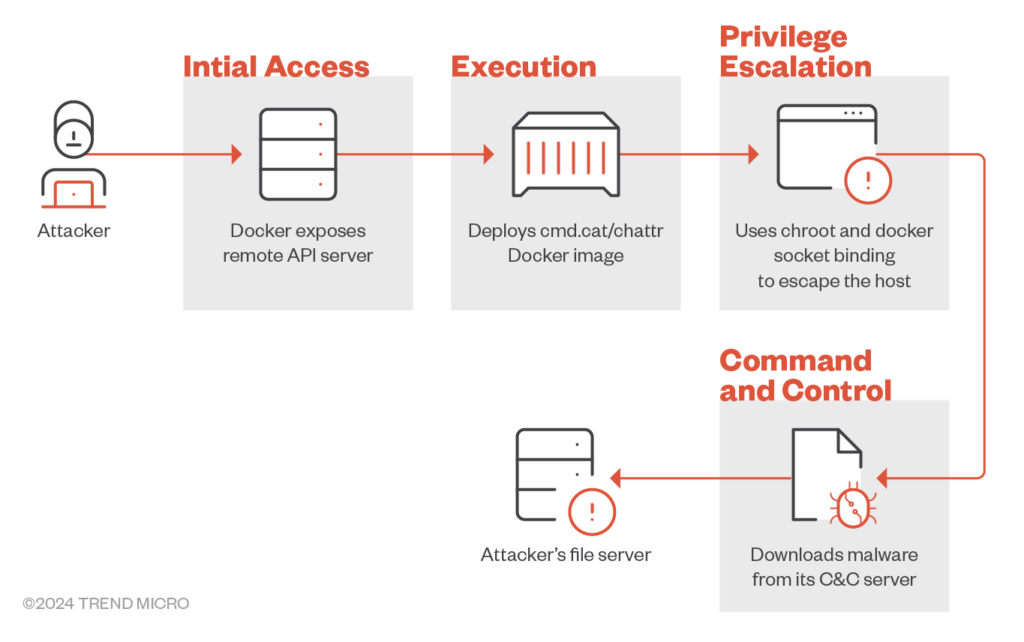
Il team di ricercatori ha analizzato una campagna di attacco che sfrutta i server API remoti di Docker esposti per distribuire miner di criptovalute. Gli attaccanti impiegano l’immagine Docker cmd.cat/chattr per ottenere l’accesso iniziale, utilizzando tecniche come chroot e il binding dei volumi per uscire dal contenitore ed accedere al sistema host.
Accesso Iniziale
Per ottenere l’accesso iniziale, l’attaccante distribuisce un’immagine Docker denominata cmd.cat/chattr. Una volta distribuita, l’attaccante crea un contenitore Docker basato su questa immagine e utilizza chroot per uscire dal contenitore e ottenere l’accesso al sistema operativo host. Successivamente, utilizza curl o wget per scaricare il binario malevolo sul sistema host.
Sequenza dell’Attacco

- Probing del Server API Remoto di Docker: L’attacco inizia con una richiesta di ping al server API remoto di Docker per verificare lo stato del server.
- Creazione del Contenitore con l’Immagine cmd.cat/chattr: Una volta confermato che il server è operativo, l’attaccante procede a creare un contenitore utilizzando l’immagine cmd.cat/chattr.
- Escape dal Contenitore: L’attaccante utilizza chroot e il binding dei volumi per sfuggire al contenitore. Il binding /:/hs monta la directory root dell’host nella directory /hs del contenitore, garantendo all’attaccante l’accesso illimitato al file system dell’host.
- Creazione dell’Immagine Docker in Caso di Assenza: Se la richiesta di creazione del contenitore restituisce un errore di “immagine non trovata”, l’attaccante scarica l’immagine chattr dal repository cmd.cat.
- Distribuzione del Contenitore: Con l’immagine pronta, l’attaccante crea un contenitore Docker ed esegue un payload codificato in base64, che tradotto risulta essere uno script shell malevolo che scarica ed esegue un binario malevolo dal server di comando e controllo.
Raccomandazioni per la Sicurezza
Per proteggere gli ambienti di sviluppo dagli attacchi che prendono di mira i contenitori e gli host, Trend Micro raccomanda di adottare le seguenti best practices:
- Configurare correttamente i contenitori e le API per minimizzare il rischio di attacchi.
- Utilizzare solo immagini Docker ufficiali o certificate.
- Eseguire i contenitori senza privilegi di root.
- Configurare i contenitori in modo che l’accesso sia garantito solo a fonti attendibili, come la rete interna.
- Eseguire audit di sicurezza a intervalli regolari per rilevare eventuali contenitori e immagini sospetti.
La campagna di attacco Commando Cat mette in luce la minaccia rappresentata dall’abuso dei server API remoti di Docker esposti. Sfruttando le configurazioni Docker e utilizzando strumenti open-source come cmd.cat, gli attaccanti possono ottenere l’accesso iniziale e distribuire binari malevoli, eludendo le misure di sicurezza convenzionali. Questo evidenzia l’importanza di implementare robuste pratiche di sicurezza per i contenitori.
-

 Smartphone1 settimana ago
Realme GT 7 Pro vs Motorola Edge 50 Ultra: quale scegliere?
-

 Smartphone1 settimana ago
OnePlus 13 vs Google Pixel 9 Pro XL: scegliere o aspettare?
-

 Smartphone1 settimana ago
Samsung Galaxy Z Flip 7: il debutto dell’Exynos 2500
-

 Smartphone7 giorni ago
Redmi Note 14 Pro+ vs 13 Pro+: quale scegliere?
-

 Sicurezza Informatica5 giorni ago
BadBox su IoT, Telegram e Viber: Germania e Russia rischiano
-

 Sicurezza Informatica16 ore ago
Nvidia, SonicWall e Apache Struts: vulnerabilità critiche e soluzioni
-

 Economia1 settimana ago
Controversie e investimenti globali: Apple, Google e TikTok
-

 Sicurezza Informatica1 settimana ago
Vulnerabilità cavi USB-C, Ivanti, WPForms e aggiornamenti Adobe


